Tuesday, May 21, 2013

Tutorial - Jello Mold Embroidery Toolkit

Since I've been doing so much embroidery, I've been thinking about the perfect toolkit for myself.  I knew it needed to be lightweight and include the following:
  • pincushion
  • water bowl
  • empty bowl to hold snippets of thread
  • scissors
  • tweezers
  • needle threader
       
 After a lot of thought, this is what I came up with.  To make it, I used
  1. 3 vintage Jello molds, 3" diameter (I found mine at a garage sale last week)
  2. Timtex
  3. 2 fat quarters
  4. fusible web
  5. batting
 

 From the Timtex, cut:
  • 4" x 10" for the base
  • 2 pieces @ 1 3/4" x 10" for the long sides
  • 2 pieces @ 1 3/4" x 4" for the short sides


Out of the fusible web, cut:
  • 1 piece 12" x 17"
  • 1 piece 6" x 9"

Iron them to the back of the fat quarter as shown.  Then peel off the paper and cut:
  • 1 piece 9"x 12"
  • 2 pieces @ 4 1/2" x 12"
  • 2 pieces @ 4 1/2" x 6"
(That chunk of fabric on the lower right gets used for a bumper.)


Now you're going to fuse the fabric to the Timtex.  Do it like you're wrapping a present.  I pressed the sides in first, as seen above.  After you do this, add a strip of fusible web to the areas indicated by the red arrows.  You need this because when you fold the top down and the bottom up, you want to be sure the right and left edges are secured.


This is what you wind up with.    

 
Now you get out a needle and thread and sew the pieces together.  It didn't take too long.  I used Silamide waxed beading thread, nice and strong.  You can see my slip stitch along the edges.

I used ric rac to cover up the fabric overlap line that resulted from the fusing.  You won't see that line when your box is filled, but I liked the splash of white and I always like ric rac.

This photograph shows a closeup view of one of the pockets in my "bumper".  These cushiony little pockets are where I stash the scissors, tweezers, and needle threader.  We're going to make the bumper next.


 To make the bumper you need:
  • 2 pieces of fabric, 4 1/2" x 10 1/2"
  • 2 pieces of batting, same dimensions
Layer them in this order:
  • batting
  • one piece of fabric, right side up
  • one piece of fabric, right side down
Sew around three sides, turn inside out, then slipstitch the opening.  That's what you see above.

Fold in half, long sides together, and machine stitch the edges.  Make pockets by adding more lines of stitching.  I made two.


Time to make the pincushion.  Cut a 7" circle.  This template is well worth the money.  

Turn under and sew a 1/4" hem, make a basting stitch around the edge with a double threaded needle, stuff the pincushion with fiberfill, then pull the thread tight and knot it off.


You're all done and ready to put the bumper and Jello molds into the box.  And there just might be room to squeeze in a couple of friends.

I used my toolkit last night and it was everything I hoped for.  It's really light and easy to carry from room to room.  After snipping my threads into the one Jello mold, I sometimes forgot to put my scissors back into the bumper pocket, which led to a few "where's my scissors?!?!" moments, but that was operator error and no fault of the toolkit.

In case you wonder why I wanted that water bowl, well, it's not for that dog.  It's to dip my fingers in before threading the needle.
 

Sunday, May 19, 2013

Little Old Pink Cradle

I bought this doll cradle at a garage sale last weekend.  I asked the seller what she could tell me of its history.  It was made by neighbors of her parents who lived up north.  They made it for her daughter so that when her daughter visited her grandparents she would have something to play with.  Those are nice neighbors.


I asked how old the cradle was, and she said at least 35 years old, because that's how old her daughter is.  That would put the year at 1978.  But look at that decal.  That style is 1950s, don't you think?  

Maybe she didn't know the whole story of the cradle.  Maybe the neighbor made it in the 1950s for his daughter and when she was all grown up the cradle was just laying around being lonely.  Then the neighbor saw a little girl next door, dusted off the cradle, and said "look what I made for you".  

Maybe I'm the one making up stories.


This is how I play with the cradle.  It's sitting under my antique ironing board holding all my flannels.


Friday, May 17, 2013

Two More Design Compositions

In the background I keep working (SLOWLY) on making blocks that feature different design compositions as described by Katie Pasquini Masopust in her book Color and Composition for the Creative Quilter.   I'm making two versions - one in modern fabrics, one in batiks.  Because I'm so slow, I only have the modern ones to show you today.


This is the asymmetrical block.  It's really hard to get the long skinny points, at least for me.  You can see I only managed two of them. 


The block is Stargazing, designed by Angela Pingel, from the book Modern Blocks.  I love this book.  I need to make more blocks from it.


This is the grid composition.  It's a paper pieced pattern called Beggar Block or Spool Block, from Charise Creates.  She did a tutorial of it as part of her Vintage Block Quilt Along.

Charise has lots of modern takes on paper piecing and comes up with some really cute designs.  I like to see recognizable objects in my quilts - chairs, flowers, dress forms (!!!) and lots of her patterns feature just such items.  I need to make more of her blocks, too!!!


I spent most of this week decluttering the house.  I took an entire car load of stuff to my favorite resale shop.  It feels very open and peaceful in my brain, now.  Just the thing to get back into the sewing room.  

I've been working on embroidery, but I have three quilting projects that have been going on forever and I just want to get them done.  You know how that feels!

Plus, I've been reading lots of Zakka  books lately, resulting in a rather lengthy list of small projects that I'm excited about.  Starting next week, I hope to get back to a more frequent posting schedule.  That encourages me to keep focused on my sewing!!!


Monday, May 13, 2013

From the Vault - Stained Glass Fish Quilt


When paging through a book on stained glass one day, I saw a piece that I liked a lot and it became the inspiration for this quilt.  I made it in 2005.  It measures 29 x 37 inches.

I wanted it to look like a stained glass window, so I used dark brown for the outer border and kept the inner border simple.

For the center part (17" wide), I made a pattern on freezer paper, which at 18" wide, was just right.


I fussy cut fish and used copper-colored fusible stained glass bias tape.  The copper color made it look like the copper foil used on real stained glass. 


I used a variety of batiks to try to give some texture to the seaweed.


One of my favorite parts of making this quilt was figuring out in what order to fuse the bias tape.  With all these little pieces, I had to make sure that no raw edges were showing, so it was a bit of a challenge.


If you heard of a town where fishermen caught and exported more than 40 million fish a year, bound for home aquariums, you might be inclined to worry a little bit.  And it's true that in some countries, the aquarium trade is responsible for overfishing.  

Some fish, like rays, take years to mature and only produce a few offspring.   Marine species are often collected by squirting cyanide into living reefs - this stuns some fish and kills lots of others, and is devastating to coral habitat.


I take you now to Barcelos, Brazil, the poster child for fishing sustainability.  The fishermen, known as piabeiros, may export those 40 million fish a year, but they are also helping protect the Amazon rainforest.   

The aquarium trade provides 60% of the cash income for the 40,000 people living in Barcelos.  This means they have a stake in protecting the river from pollution caused by timber and mining interests, as well as cattle ranching.

But worldwide, nearly 90% of freshwater aquarium fish are from fish farms, instead of the wild.   Piabeiros are starting to lose their jobs.  If it continues like this, reasons to resist mining and logging will disappear.


The piabeiros scoop the fish from the water with handheld nets and instantly release any unwanted fish.  They mostly catch cardinal tetras, the most popular aquarium fish in Europe.  Normally these fish are plentiful.  If they find there are less per scoop than there should be, they move on to another area until populations come back again.

The tetras that are caught are the lucky ones.  They have a lifespan of one year in the wild, but two-three years in captivity.  But I guess it would be up to the fish to decide if a short, free life is better than a longer one in an aquarium.
 

Sunday, May 12, 2013

Not Just Another Pretty Face


PIGIPEDIA
Pigs are omnivores, which means they eat both plants and other animals.  They will generally eat whatever is given to them, including insects, worms, and tree bark.  When living in captivity under high stress, they may even eat their own young.  Feral pigs will sometimes eat other dead pigs.

For the most part, farmed pigs are fed a mixture of corn and grains (wheat, oats, and barley) supplemented with protein, vitamins, and minerals.  Lucky pigs also get to eat roots, grass, leaves, flowers, fruits and vegetables, and for the very luckiest - truffles.


Thursday, May 9, 2013

What's Cookin'?

Last week I spent a wonderful amount of time at garage sales, thrift stores, and an antique mall.  I sure came home with some fun stuff.  Time to share some of it with you!


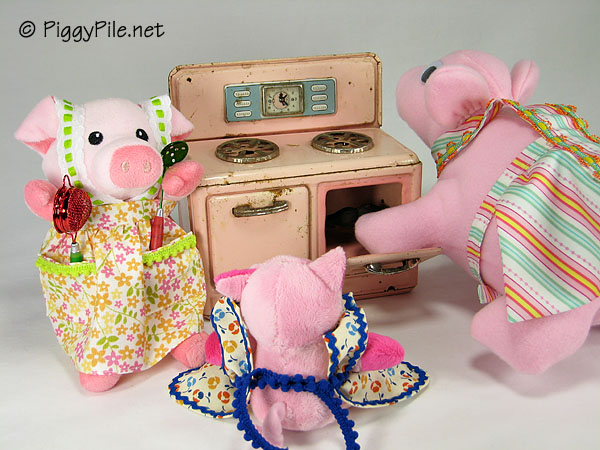
I wanted a little toy stove for a long time.  In a quilting magazine a few years ago, they showed the workspace of a quilter who had so many cute things.  She had a little stove and I guess that's what got me going.  I found one at a county flea market last year, but it was way too pricey.  This stove is smaller and cheaper, both OK by me.  And it's a nice pig color.


Now that they had a stove, the pigs were in an apron-y moodThey remembered the apron I made for my dress form in It Hadn't a Thing to Wear.    I bought these two patterns for teeny aprons a few months ago, and the pigs dragged them out and left them on my work table.  Hint, hint.


They dug up some notions they liked...


... and pointed out the fabrics they wanted.


These are the little aprons I made this week.  I think I could have made big aprons in less time!  Gosh, these little things are very fiddly.  The one in the center was the first one and took the most time.  It's fully lined.  The trim in the center is actually edging on a front bib (also fully lined) that is sewn to the skirt.  The pattern had the bottom of the bib and skirt lined up, but I liked it a little higher.

The one on the left is the second one I made.  It's not lined.  There are little pockets and a ribbon bib.  The pattern told me to make the bib out of fabric straps to which I was supposed to sew trim,  but I cheated and went right to the trim.  Both of these aprons are Simplicity 1957.

The teeniest one on the right is the one I made today.  It's my favorite so we're going to take a closer look at it.


This is Simplicity 2748.  I changed the pattern somewhat.  You're supposed to sew bias tape around all the edges to finish them.  I didn't have any 1/4" bias tape.  I did enough running around last week and wasn't in the mood to go shopping again so I made do with the trims I had in my stash.  

I cut an extra 1/4" around all the edges, then clipped the curves and pressed the 1/4" under.  Then I sewed on the baby rick rack and that finished the edges.  The bright blue on the lower right is one of two pockets.  For apron ties, I used some micro pom-pom trim to speed things up, instead of making a fabric tie.  The pattern had pleats on the front - stitching them is how you attach the ties.


You know how on some episodes of Project Runway the contestants have to make clothes for "real people" instead of models?  They usually hate doing that, because the "real people" don't have bodies that match their dress forms.  Well, the same principle applied here.  Luckily I have some really good natured pigs and they're more than happy to make do.

Judging from the way that one is sticking her foot into the oven (there's a rotisserie chicken in there - too cute!!), I might need to make some little pot holders for them.


I found this plate for them last week, too.