It's not that I like skyscrapers in particular.
But I sure do love this skyscraper fabric. It's the focus of my one-block quilt and I'll have it finished and ready to show you next week.
I thought this would be a good companion project to hang near my skyscraper quilt. I'll have this finished and ready to show you next week, too.
I went shopping for skyscraper-related objects this week to go with those two fabric projects. I found this painting whose colors coordinated. Although it's a stretch to call these skyscrapers, it's a really fun painting and we'll look at the whole thing next Monday, Fun Day.
And that's why next week is Skyscraper Week.
I'm almost done with my one-block quilt. I finished the quilting, and since I pulled my top threads to the back again, I also have all the knots tied off.
I think this is my favorite part of making a quilt - squaring up the edges after the quilting is done.
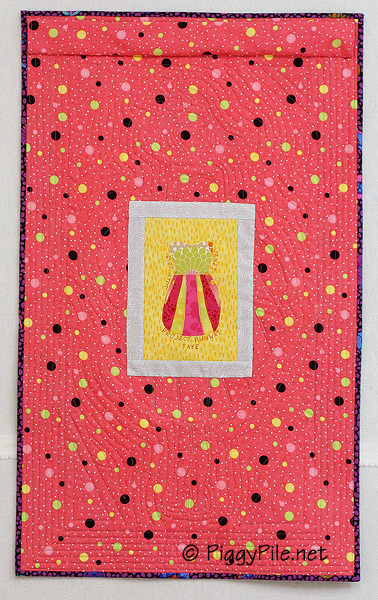
Three weeks ago, I finished everything on this quilt except the label. Finally got that done yesterday, so it's ready to show.
The pattern is "Project Runway ... Faye" by Laura Heine. The technique is fused applique. I made a number of changes, some because I wanted to, and some because of technical difficulties on my end.
Changes to the pattern:
- hair
- face
- legs
- border
Here's my version, measuring 20" x 34" (2" smaller than the pattern).
Explanation of changes to follow...
I gave her more hair under on the right. I think the pattern was designed to look as if her hair was tucked behind her ear. Instead, it looked like a bad haircut. Now she has equal amounts of hair on both sides of her face.
Speaking of her face, I didn't put in any features. It's hard to get a decent expression on a face and rather than risk a mess, I opted to go for the anonymous look.
The pattern had the legs smushed together with no daylight between them; I like them separated a little, with two distinct shoes.
I liked the border on the pattern better than what I did. But I had technical difficulties, like I said. I blame it on the crummy fabric (loose-weave fabric from a chain store) that I used for the background. The fabric got all stretched out on the part that wasn't fused. So after all the ironing of the fused pieces, the center was flat and the edges were all poofy and up in the air like a stretched-out bias angle.
The border called for more fused applique, which wasn't an option on all those waves. So I cut the four corners of the block on an angle, cutting off as much of the "wiggle" as I could. I patched in some nice flat fabric. Then I did a conventional border.
For the quilting, I edge-stitched along the fused edges, then did free motion echo quilting on the background. That helped take up some of the poofiness. Then I did a bunch of straight-line rows in the border, and blocked it after binding to make it nice and flat.
The back.
And the label.
I have three other fused applique patterns in the queue - a bicycle, an elephant, and houses. You can be sure I'll be using good fabric for the background.
But before I get to them, I want to make an ironing board cover, a cushion, a cover for my glider/rocker, and a quilt for a bale challenge. And before I start any of those I want to finish that big block quilt with all the options I showed you last week. That thing looks a bit different now!
Scrapbook paper usually has an all-over design.
But this piece didn't. I trimmed off the "rain" on the right-hand side, popped it in a frame, and it made a fun and inexpensive print.
Today is the day I took my one-block quilt in for show and tell. Since I just started it yesterday, I was only able to make the top. It wound up as 32" wide and 34" square.
Today I'll show you the various options I tried out, and after the entire quilt is done, then I'll tell you which one I chose.
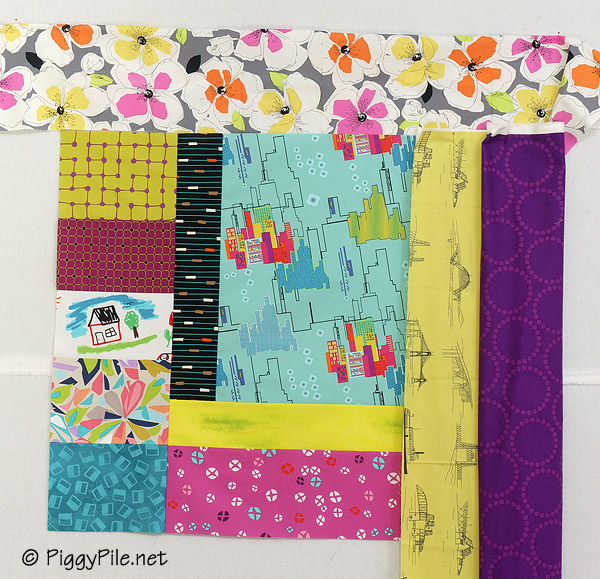
This is the section that stayed the same in all the options.
The focal point is the aqua skyscrapers in the upper right. The black stripe to the left is a Michael Miller print, and now that I look at it, the narrow strip with the stripes going horizontally make it look like a skyscraper at night with some lights on.
As a counterpoint to the sleek skyscrapers, I fussy cut a crude drawing of a house and used it in the left border.
As I mentioned yesterday, the block is based on Rachel
Roxburgh's Mouse in the House, a variation on Log Cabin and Courthouse
Steps. I made some minor changes from her block, like putting five
fabrics in that left column, when she had four. And I added a second
column on the right (which you'll see in the options below.)
In each of these options, the fabrics that will change are the upper border, and the two strips on the right.
So, here's Option 1. The large floral across the top gives it a spring feel.
The white strip gives the block some breathing space, and the yellow/green fabric is a print of various bridges, which fits in with the New York skyscrapers.
Option 2 swaps out the bridges for a dark purple to put a visual stop on that edge.
Option 3 brings back the bridges, but slides them to the left.
Option 4 keeps the bridges and purple on the right, but brings in a 1960's-inspired retro print for the top.
Option 5 loses the bridges and brings back the white.
And Option 6 brings back the bridges and drops the purple.
There were two of these options that I went back and forth and back and forth on. One looked better in the photograph, and the other looked better in person. So of course I picked the one that looked better in person.
I'm piecing the back now, and will have this ready to show you next week.
The July challenge for the modern club I'm in is to take a block you like and enlarge it to make a quilt out of it. The quilt can be any size you want, but it's made up of just that one block.
I thought I was done procrastinating after the two rush quilts I made in
June, but this time I procrastinated more than ever. We meet tomorrow,
and it was only yesterday that I picked my block and fabric. Today I start cutting and sewing.
This is the fabric.
And I picked a block from Modern Blocks. It's Mouse in the House by Rachel Roxburgh, and it's sort of a cross between Log Cabin and Courthouse Steps, two of my favorite blocks.
I have one day to make it, and when I show it to you, you're going to wonder why I even needed a pattern. Well, the answer is because I'm in a hurry and I want something to copy.
There's no way I'll get the whole quilt done, unless I make the block small. But I think I want it at least 2 feet square, so if I get the top done, that will be good enough for show and tell.
Last week I showed you a cupboard I converted into something more my style. This week I finished doing something similar with a little dresser.
This is how it looked when I bought it many years ago at a botanical garden gift shop. I eventually got tired of the pastel colors and cottage-y look, so I made it live in a box in the basement for the last few years. I tried to give it away last month, but no luck, so I decided to keep it and use up more of my yellow spray paint.
This is how it looks after making it mine. It's a little thing, 8" tall, 6" wide, and 3" deep. The knobs are glued in, darn it, so I had to leave them alone.
Once again, I tried to dial back a little on all that yellow. I had wooden buttons the same shape as the flowers on the Washi tape. At first I put vertical strips of Washi tape on the middle drawer, and four buttons on each drawer. Too much, so I pulled all that off and got out lots of plastic buttons and pretty much covered the front of each drawer with a different color. Again, too much.
Back to Plan A, edited a bit. With less on the front, I was able to get away with adding some paper on top. It's pretty much the same yellow, but with a modern white chevron to lighten it up a bit.
When I added the trim to the top, I felt very carpenter-ish doing so. I used
a tiny little saw and jig to hold the wood straight so I could get
perfect 90-degree angles. Then I was very patient as I put on two coats of paint and gradually glued the sides separately from the front and back.
The interior of the drawers remains as it was when I bought the dresser. Not a perfect match to the Washi tape, but close enough. And it's nice to have that little bit of history.
When you find good things on sale, you need to make them work.
I was at my favorite garden store recently, and as soon as I walked in the door, I spotted this mini couch with a big fat "half price" sign. The coordinating chair and table were also half off, but I restricted myself to my favorite of the three. That way I felt like I was being logical, instead of what I really was, which was buying something I didn't need.
I must have spent an hour looking at houseplants to go with it. I wanted something that looked like a tree and I couldn't find anything suitable, Frustrated, I walked outside and found tiny cedar plants. Perfect. Plus, a metal pot on clearance for only 70 cents. Ooh. A little crowded, but call it cozy instead.
I already had the blue bird house and I added some large rocks for "boulders".
The two cedars could transition to outside if I wanted to put them in the ground, which I don't. In the two weeks since I put this planter together, they've grown by about a third. There's some pruning in the not too distant future.
I have it on the corner of my desk, a good reminder to slow down and relax.