On a trip to the International Quilt Market years ago, I came across a vendor with the most wonderful assortment of beads, buttons, pins, and trinkets.
I bought this cloisonné bead depicting a Jazz Age party.
It's shaped like a discus - fuller in the center, sloping outwards along the edge. The diameter is 2.5" and it's .5" tall in the center. It feels heavy, but it only weighs one ounce.
I never came up with a good idea on what to do with it, but I think I have one now.
Showing posts with label beads. Show all posts
Monday, November 9, 2015
Thursday, December 18, 2014
From the Vault - House Quilt Finale
Today we're going to look at the final blocks of the House Quilt that I made in 2003.
To refresh your memory, the top row was winter.
Row two was spring.
Row three was summer.
And today we have the bottom row, autumn.
Here's the full quilt, so you can see all the blocks in context.
The first house in the autumn row is the dog house. The Siberian Husky is a pin that I bought at a dog show. Dog bones are quilted on the roof.
The gold fabric at the bottom with the free-motioned leaves is the bottom border fabric for the autumn row.
The apples came from this tree. Another bushel sits on the ground.
The same sky fabric was used on the apple tree and this autumn-colored peacock house. The peacock fabric has a bit of sparkly gold on it, so I used shiny bugle beads to make the window mullion. A tiny gold seed bead is the door knob.
On the right is spillover foliage from another tree.
This is the big fat tree. It was my easiest block, by far.
Pagoda-style house with bamboo door, oriental foliage in the front lawn, and a pineapple (symbol of hospitality) button in the window. Step inside for some peace and tranquility.
The last house in the row. House plants in the windows, a tricycle parked outside.
And this tree is the final block of the quilt.
Well, that was my house quilt from last decade; now I'm going to make a modern one starting next year. I think I'll expand the scope of it to have stores, so it will be more like a little village. I should make a goal of doing one block a month. I should, huh? Well, OK, I will.
To refresh your memory, the top row was winter.
Row two was spring.
Row three was summer.
And today we have the bottom row, autumn.
Here's the full quilt, so you can see all the blocks in context.
The first house in the autumn row is the dog house. The Siberian Husky is a pin that I bought at a dog show. Dog bones are quilted on the roof.
The gold fabric at the bottom with the free-motioned leaves is the bottom border fabric for the autumn row.
This is the next house, with a basket of apples (button) sitting in the kitchen window. The door knob is a button, also. For quilting on this block, I free motioned some apples.
The apples came from this tree. Another bushel sits on the ground.
The same sky fabric was used on the apple tree and this autumn-colored peacock house. The peacock fabric has a bit of sparkly gold on it, so I used shiny bugle beads to make the window mullion. A tiny gold seed bead is the door knob.
On the right is spillover foliage from another tree.
This is the big fat tree. It was my easiest block, by far.
Pagoda-style house with bamboo door, oriental foliage in the front lawn, and a pineapple (symbol of hospitality) button in the window. Step inside for some peace and tranquility.
The last house in the row. House plants in the windows, a tricycle parked outside.
And this tree is the final block of the quilt.
Well, that was my house quilt from last decade; now I'm going to make a modern one starting next year. I think I'll expand the scope of it to have stores, so it will be more like a little village. I should make a goal of doing one block a month. I should, huh? Well, OK, I will.
Tuesday, August 26, 2014
R is for Rain
I finished a quilt yesterday. Our quilt guild is having a challenge where you make a mini-quilt with a theme that starts with the letter "R". I've wanted to do an umbrella quilt for a long time, and I recently (and accidentally) unearthed some forgotten charm squares with a rain theme. Rain + umbrella = works for me.
The squares were given to me a few years ago. I had enough to make one nine-patch for the front, and another for the back. The quilt is supposed to be 12" but because I used charm squares, it came in a little larger, at 14" square.
I put the darkest square in the center, then fused a 4-section bright yellow umbrella over them all.
Umbrellas have pointy things at the top, so I found a pointy bead to use up there.
You can see that each of the umbrella sections is a different fabric. I just dug through my yellow scraps until I found four that looked good together.
I machine stitched the fused edges, then tried a succession of different handwork until I found one I liked. I settled on chain stitches since they looked like a drop of water, then added a seed bead at the top of each one for some sparkle.
The bottom of the umbrella is edged in bugle and seed beads. At the pointy ends, I stacked two sizes of beads to look like the spoke ends.
Tucked under the umbrella, seen through the distance of the stormy grey sky, is our destination: a happy place. Sun shines down on a cute little pink house, flowers in the garden, and a dog in the front yard.
The quilting is sheets of rain falling down. I hand-stitched the binding, not my usual machine stitching.
The back.
With all the embroidery on the front, the back wasn't as neat as I would have liked. I tried to carry stitches where I could, but there still remained enough visible ones. I had a plan to make a big fat cloud label, big enough to cover the mess. But that would have covered up too many of the cute squares, so I made a downsized cloud instead, and told myself to relax about it.
The squares were given to me a few years ago. I had enough to make one nine-patch for the front, and another for the back. The quilt is supposed to be 12" but because I used charm squares, it came in a little larger, at 14" square.
I put the darkest square in the center, then fused a 4-section bright yellow umbrella over them all.
Umbrellas have pointy things at the top, so I found a pointy bead to use up there.
You can see that each of the umbrella sections is a different fabric. I just dug through my yellow scraps until I found four that looked good together.
I machine stitched the fused edges, then tried a succession of different handwork until I found one I liked. I settled on chain stitches since they looked like a drop of water, then added a seed bead at the top of each one for some sparkle.
The bottom of the umbrella is edged in bugle and seed beads. At the pointy ends, I stacked two sizes of beads to look like the spoke ends.
Tucked under the umbrella, seen through the distance of the stormy grey sky, is our destination: a happy place. Sun shines down on a cute little pink house, flowers in the garden, and a dog in the front yard.
The quilting is sheets of rain falling down. I hand-stitched the binding, not my usual machine stitching.
The back.
With all the embroidery on the front, the back wasn't as neat as I would have liked. I tried to carry stitches where I could, but there still remained enough visible ones. I had a plan to make a big fat cloud label, big enough to cover the mess. But that would have covered up too many of the cute squares, so I made a downsized cloud instead, and told myself to relax about it.
Friday, May 9, 2014
Thursday Was Purse Day - Bee Happy Purse
Thursday is supposed to be the day I show you purses I've made. Today is Friday. I didn't have time to write this post yesterday, so it's a day late.
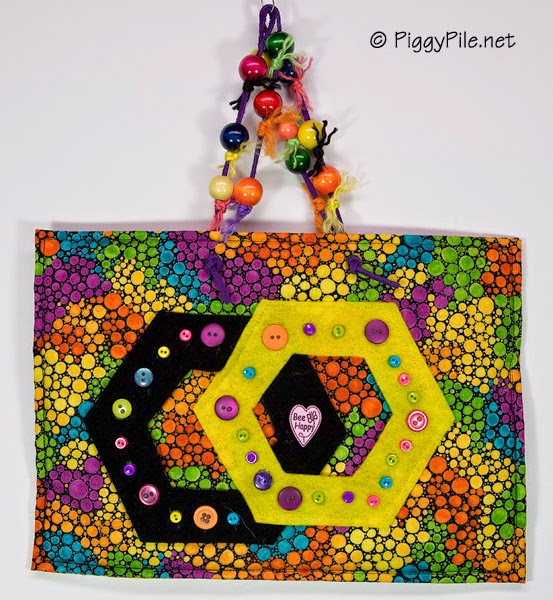
This is the front of Bee Happy Purse. I saw some big fat bumble bees around my new plants this week, and I was reminded of this purse I made in April, 2009.
I used a lot of hex shapes on it, because of a bee's honeycomb.
The bee on the right is visiting a flower to do whatever bees do, and the bees on the left are going back to their hive.
The front of the purse is made of felt. That's fun to work with!!! The upper right corners were trimmed back to show the lining fabric.
The handle is made of leather cord and wooden beads. Little knots of yarn act as bumpers to keep the beads separated.
To strengthen the hole on the purse, I added another layer of felt (yellow hexes), then put a grommet through the two layers.
The back is the same fabric as the lining. This fabric looks a bit like honeycombs, and the colors aren't a reach either. Honey can be different colors depending on what the bees feed on.
It was more fun to glue the buttons on than to sew them. This was back when I used a hot glue gun, but now I prefer Aleene's tacky glue.
Lastly, the center button is the purse's namesake.
This is the front of Bee Happy Purse. I saw some big fat bumble bees around my new plants this week, and I was reminded of this purse I made in April, 2009.
I used a lot of hex shapes on it, because of a bee's honeycomb.
The bee on the right is visiting a flower to do whatever bees do, and the bees on the left are going back to their hive.
The front of the purse is made of felt. That's fun to work with!!! The upper right corners were trimmed back to show the lining fabric.
The handle is made of leather cord and wooden beads. Little knots of yarn act as bumpers to keep the beads separated.
To strengthen the hole on the purse, I added another layer of felt (yellow hexes), then put a grommet through the two layers.
The back is the same fabric as the lining. This fabric looks a bit like honeycombs, and the colors aren't a reach either. Honey can be different colors depending on what the bees feed on.
It was more fun to glue the buttons on than to sew them. This was back when I used a hot glue gun, but now I prefer Aleene's tacky glue.
Lastly, the center button is the purse's namesake.
Thursday, January 9, 2014
Thursday is Purse Day - Dress Purse
A couple of years ago, a friend from India got married. She liked pretty dresses, so I made her a "dress" purse in rich jewel tones, like saris.
The handles are coat hangers that I wrapped in lace.
I bought the blue flower, already ruched, but I added the button in the center to coordinate with the bodice. Same color, same sheen, and it even picks up a little of the teal.
Brocade skirt, lightly gathered at the waist. The belt is two layers of trim: the bottom layer is dangly beads, with the blue strip glued on top.
Chiffon is very sheer, so I pleated it to give it layers which made the color stand out, and to give it some dimension. It came with the sparkly bits on it
I added two hearts that would sit right over the real heart if this were worn by a tiny person.
The bottom of the dress has three layers of plain green satin, which I edged with hand beading. The belt was a very thick, multi-colored ribbon.
From the side, you can see the split personality.
The inside is lined with peacock-motif cotton.
The usable part of the "purse" part only goes to the waist. It opens from the shoulders to the underarm. There's hand stitching from the underarm to the waist, and machine stitching across the waist (before the trim was added) to close the bottom of the purse.
I bought the blue flower, already ruched, but I added the button in the center to coordinate with the bodice. Same color, same sheen, and it even picks up a little of the teal.
Brocade skirt, lightly gathered at the waist. The belt is two layers of trim: the bottom layer is dangly beads, with the blue strip glued on top.
Since she likes clothes
so much, I made a different dress for the other side. This time the
hanger is green, to match the green skirt.
Chiffon is very sheer, so I pleated it to give it layers which made the color stand out, and to give it some dimension. It came with the sparkly bits on it
I added two hearts that would sit right over the real heart if this were worn by a tiny person.
The bottom of the dress has three layers of plain green satin, which I edged with hand beading. The belt was a very thick, multi-colored ribbon.
From the side, you can see the split personality.
The inside is lined with peacock-motif cotton.
The usable part of the "purse" part only goes to the waist. It opens from the shoulders to the underarm. There's hand stitching from the underarm to the waist, and machine stitching across the waist (before the trim was added) to close the bottom of the purse.
Subscribe to:
Posts (Atom)