I finished the cover for my reading chair this week. It's ready for reading, which is just what I've been doing.
Here you can see the mostly solid seat cover. I think it makes a nice transitional landing spot between the striped back cushion and the floral ottoman.
The loose pillowcase-style cover for the back cushion is nicely informal and was super easy to make. I'll definitely make that style again when it's time for another redo. But that will have to wait until the next time I fall in love with another ottoman.
In all my years sitting in front of a sewing machine, it was always on a chair with a back. The chairs have changed over the years, and for a long time it's been a very comfortable office chair that swivels and goes up and down. Sometimes I make covers for it, sometimes I leave it uncovered.
The other day I decided I was tired of the chair back getting in my way. I would swivel it around to sit down, then swivel it back around to face the machine, and then scooch it in. It seemed so hard. Not that I'm impulsive or anything, but as soon as I realized a person could sit on a stool just as well as a chair, well, I grabbed my car keys and headed out shopping.
I went to five stores, came home with three options to try out, and settled on this. I love everything about it, including the knockout color, comfortable seat, brassy legs, and open profile which makes the room look bigger. Plus it's super light and easy to move around, not that I've done it much. It's going to stay in front of my machine for a long, long time.
It doesn't work for everyone, but it works for me.
It inspired a new project, so I dropped the one I had been working on, and am close to finishing the new one. More about it tomorrow.
I finished my sewing room chair yesterday. It's a very comfortable office chair with casters, and I liked everything about it except for the slightly worn upholstery. To make it easy on myself, I made a sleeve that slides over the back and a small flat quilt to lay on the seat.
It's been going on for too long, so I'm glad I finally finished it. In mid-September I made all the blocks, and in early October I pieced them.
Here's the finished product. Let's walk through what I did since early October...
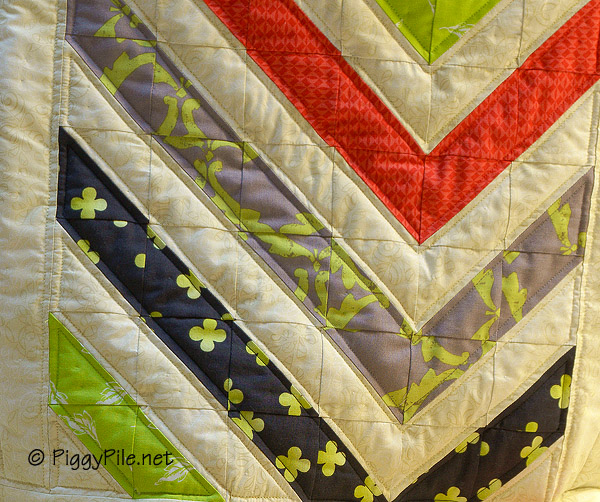
I added borders to the chevron blocks to make it large enough to cover the chair back. I placed the top block upside down, so that when it's folded in half, both blocks will have their V's pointing down.
Then I pieced a slightly larger piece for the backing, using my second-tier (less than favorite) fabric. I'm always glad of a good way to use up that fabric.
Close-up of the backing. It's not so bad; I think these are all Kaffe Fassett.
Pin basted. It's nice to work with something small enough that I can work on my table, instead of the floor.
For quilting, I matched the thread to the fabric color, because I didn't want the thread to show.
Echo quilting.
The seat cover has the same fabric on the front and back. Since the seat is wider (going from side to side) than it is deep (going from front to back), I quilted the lines parallel to the long edges. That helps in the draping. I used multiple thread colors, but did each color in blocks of parallel lines.
Here are the finished parts. I used the same binding on the two to tie them together. That sturdy little back is standing up all on its own.
The cover for the chair back just barely touches the seat cover. The binding on the chair back is much narrower than on the seat because I didn't want to cover up very much of the orange. Plus with just one fabric on the seat, a wider binding gives it a little more interest.
It seems I'm always rearranging / redecorating my sewing room, and I can see many more chair covers in different color schemes in my future. But not for awhile yet.
Last week, after I bought the book Quilts by Monday, I said I was going to make a quilt by this week. What I neglected to say was that first I was going to make a cover for my office chair. I needed a cover because I recently painted one of the walls orange, and the chair needed to step up and join the party. I thought it was going to be a quick project, but it took at least three times as long as it took to paint the wall.
Last week I also said I was going to use up as much of my fabric as possible. but I didn't have anything the right scale, so I had to go shopping. I bought one yard each of these home dec fabrics at Jo-Ann Fabrics. I didn't pay attention to the fabric content, nor to the laundering instructions which recommended dry cleaning. I knew I was going to wash them eventually, and I'd rather have a surprise before I made my project instead of afterwards.
This photograph shows the selvages after the fabric went through the washer and dryer. The green/cream is mostly cotton, and was full of wrinkles and ravels. It looked normal. The print on the right came out without a wrinkle and not much raveling. It must be nylon or something. And it's really slippery! I couldn't use it on the seat, even with cotton for backing. I tried it, and I slipped off the chair every time I swivelled.
I wanted the fabric to have some body, so I decided to quilt it. For the chair top, I made a large rectangle using the multi-color nylon print, backed with this yellow cotton I already owned. (So I did manage to work in some existing fabric after all.) I quilted from the front, free motioning around the motifs. You can see the pattern of quilting better on this yellow side.
This is the outside of the chair top. I folded the rectangle in half and slipped it over the chair back. The slipcover top was too wide, so I kept moving pins until I figured out where I wanted my seam allowance. Since I wanted this large pattern centered, I did this on both sides.
Here I'm auditioning the rest of the fabric. I used the green/cream in the upper right on the seat. For its backing, I used the two yellow fabrics on the bottom that were in my stash. To finish the raw edges, I thought a contrasting stripe would be pretty. I decided to use both the pink and the orange, also from the stash.
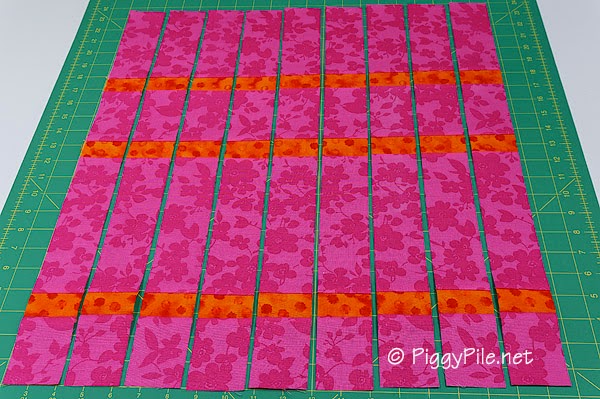
I wanted mostly pink, with just a spark of orange. To make it easier, I first sewed strips of orange to large strips of pink, then I crosscut the large pieced rectangle into 2" strips that would be my edging.
 It took so long to free motion quilt the chair top, that for the seat I just did straight-line quilting.
With all the quilting, there wasn't much draping going on. To me, the chair looks like it's wearing a party dress - a brightly colored, sleeveless bodice and a twirly, swirly skirt. That's why I call it my Party Dress Office Chair.
It took so long to free motion quilt the chair top, that for the seat I just did straight-line quilting.
With all the quilting, there wasn't much draping going on. To me, the chair looks like it's wearing a party dress - a brightly colored, sleeveless bodice and a twirly, swirly skirt. That's why I call it my Party Dress Office Chair.
I was Halfway to My Rocking Chair just under two weeks ago, and now I'm done.
I top stitched all the seams so they wouldn't unravel when I washed the panels. I don't usually prewash anything, but I wanted to be sure the fabric was shrunk before I made the slipcovers. It came out all rumply and didn't entirely flatten out after ironing.
The cushions were an odd shape, so I needed to make patterns. I taped brown paper together until I had a sheet large enough, then traced around the cushions, being careful to keep the pen perpendicular to the paper. The cushions are 4.5" tall, so I divided that by 2, added a 1/2" seam allowance, and that gave me my cutting allowance.
To add the zipper, I sewed the front to the back panel, which made a long rectangle. On the seam line, I used a basting stitch where the zipper was going to be, and a regular stitch going out to the raw edges. I laid the zipper face down along the seam line on the inside, and stitched around it. Then I removed the basting stitch, folded the rectangle in half, right sides together, and machine stitched the remaining three edges.
That was my plan, anyhow. I had two variances:
- For the first cushion, I forgot to remove the basting stitch before sewing the slipcover shut, so I couldn't get at the zipper to unzip it. Uh oh. I had to rip out a hunk of a side seam to get at it.
- The back cushion had quite a curve along the top and side edges, so I had to put the zipper on the bottom. The next day I realized there was no way that opening was going to be large enough to push the cushion through, so I cheated and left the top open, put the cushion inside, then stitched it shut by hand. This is exactly why I wanted to use zippers in the first place, so I wouldn't be resorting to this trick of "permanently" sewing a cover over a pillow.
Oh well. The whole experience was much less than enthralling, so I threw my patterns out and have no plans to make more slipcovers. Next time I want a different look, I'm going to throw a big quilt over the chair.
Here is what I've been calling Side A.
And this is Side B.
The idea was to mix and match the two sides, so let's look at a few.
Side B back and seat, Side A footstool.
Side B back and footstool, Side A seat.
Side B back, Side A seat and footstool.
Side A back and seat, Side B footstool.
With the completion of this rocking chair, my UFO projects are down to just one. And guess what? I'm not going to work on it until who knows when. I was so good this year, working through most of them and I want to work on NEW things.
This wore me out. I'm going to go sit a spell.