Showing posts with label lamps. Show all posts

Friday, June 17, 2016

Making It Mine - Vintage Floral Lamp

Making It Mine is about buying a new or vintage item and changing it up to make it mine.


This was my latest project - a lamp base from an antique store.  The sign said "it works" which was good to know, since it was missing some parts.  Just to be sure, I had them try it out with a light bulb before I bought it.

As you can tell, the main thing missing is a lamp shade.


Another thing missing was the knob to turn it on and off.  Luckily it was in the "on" position when they put the bulb in.  Who wants to turn a lamp on and off with needlenose pliers?  Not me.


When I took the lamp to the hardware store to see if they sold knobs that would fit, they told me there was a piece missing from the center, too.  You're not supposed to have just that piece of cardboard.


The hardware store man found a lamp kit, opened it, added the gold center part and put on the knob.  How easy was that?  

I still needed a shade, though.  As you can tell from this picture, it probably originally had a glass globe for a shade, sort of like what goes on a hurricane lamp.


The store didn't have the right globular shape that I needed.  I didn't like the skinny clear ones they had, either.  I liked the looks of this pendant shade, though, so that's what I bought.


Here's what it looks like now.  The shade is not the right proportion, but the color is nice.  And that circular band looks a little odd, but so what.  It's definitely not as matchy matchy as it would have been with the original shade.

When I turned the knob, I got a nice surprise: there's a bulb in the base.  So with one click, the base turns on, with two clicks it turns off and the top bulb turns on, and with three clicks you get both.  I like the lamp even more now.


Thursday, December 17, 2015

Magnifier and Lamp Combo

I joined an applique club a few months ago, and although I missed the last two meetings, I still consider myself a member.  We sit and sew at the meetings, which last a few hours.  After that first meeting, I went over to Jo-Ann Fabrics for a crucial piece of equipment.


I looked at a lot of options, and this one seemed the best for me.  It has both a magnifier and a lamp, in a heavy base so it won't tip over.  Both arms are goose-neck adjustable,  independently.  It works great, and it's portable so I can take it to the meetings.


I used it the other day when I did my dog's nose.

I love this lamp so much that it inspired me to reorganize a corner of my sewing room.  I gathered all my applique, embroidery, and embellishment paraphernalia and they're now in this newly dedicated spot.  I'm doing the final organizational steps, and when it's all done, I'll show you.


Monday, September 22, 2014

Monday is Fun Day - Oriental Lamp

Monday is the day we look at fun things I've collected from antique stores, flea markets, garage sales, or new items from good, old regular stores.  I decided I had way too many things that used to be fun when I first bought them, and now I'm ready to let them go.  This weekend I started bagging them up to donate to a small, local charity.

I bought this lamp at an antique mall several years ago.  There was always something I liked, yet didn't like about it.  I think part of the "didn't like" was the underside of the hat reminding me of a mushroom.   Nowadays when I shop, if there's any aspect at all that falls in the not-sure-how-much-I-like-it bucket, I don't buy it.

I've only used this lamp for a few months in the years since I bought it, so it's time to move it on out.  I hope the next person gives it a good, permanent home.

Saturday, June 21, 2014

I (Heart) My Lampshade

I covered a new lampshade this week, using a self-adhesive shade I bought from Jo-Ann Fabrics last year.  The whole thing (excluding shopping for fabric) took about 1/2 hour. 


Craft stores don't sell these lampshades any longer.  After I finished this project, I called around and got the bad news.  Rats!  If I had know this was going to happen, I would have bought all the other ones they had.


I found the glass lamp base at a thrift store last July, but didn't use it until now.  The lamp that used to be here followed my Party Dress Office Chair over to the orange wall in a different room.  So I went to my lamp vault and picked this one out.  It came without a shade, and I was in the mood for a small project. 

I wanted a youthful shade to jazz up the classic base.  The fabric is flannel.  I didn't go looking for flannel, but this design hit my spot and the colors were perfect for that space, so flannel it was.  I thought it might be too stretchy to work with, but it was fine.   


To complement the new lamp, I redid the top of the cabinet. 


I already had this pig planter; a quick trip to the garden center turned up a new little pink plant to make one happy pig.


My little poodle, puzzling over one of the pincushion jars I made.


 It's been rainy lately, and the lit lamp makes it nice and cozy inside.


Monday, May 26, 2014

Monday is Fun Day - Italian Tole Daisy Lamp

I'm starting a new feature today, called "Monday is Fun Day".  Every day should be a fun day, really, but Monday rhymes so we'll go with that.  What we'll do is look at fun items I've collected from flea markets, antique stores, art shows, thrift stores, and garage sales.

I went to my first flea market of the year earlier this month.  One vendor caught my eye because of all the hanging chandeliers.  It was a perfect day, temps in the 60s, and the sun made all the chandeliers sparkle.

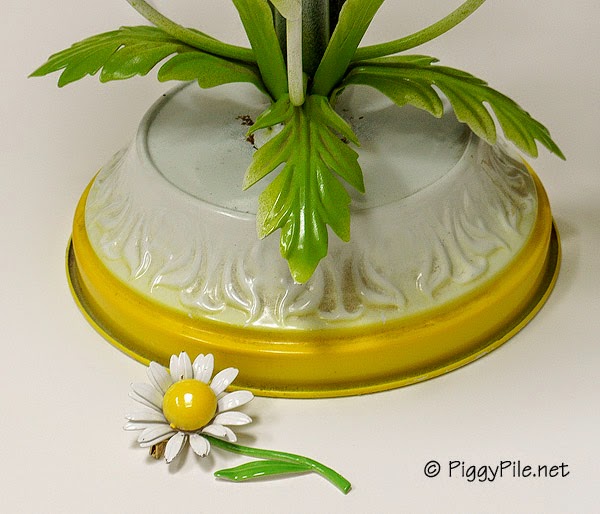
I don't have any use for a chandelier, but I definitely needed one of his Italian tole lamps.  This one is from the late 1960s to early 1970s.  I love lamps.  I counted how many I had once, and it was such a big number that I put a mental block on it and can no longer remember how many it was.  Then I told myself not to count them again.


I love my new lamp because it reminds me of this daisy pin from the same era, which I bought last year. 


The lamp didn't have a lampshade, just a harp.  I carried the lamp to numerous stores looking for a shade that had the "cross hairs" level with the top of the shade.  Most of the shades nowadays have that part dropped about halfway down the shade.

I wasn't having any luck, but I did find out I was harp-challenged when I explained my predicament to a store employee.  She grabbed the harp, squeezed, (while I held my breath and hoped she wouldn't break my lamp), and said "They usually come out like this."  And miraculously, she removed the harp.  I had tried pulling and pulling on it previously, to no avail.  Squeezing did the trick. 

And now, being harpless, I  found myself with a plethora of lamp choices.  I picked this one from Target, because it looked like metal (even if it wasn't), and matched the metal base.

Good thing I won't be using the harp in the future, since I managed to lose the finial.  I think some things get done accidentally on purpose.


The vendor had rewired the lamp, so it's safe to use.  With the light on, the shade turns a nice pale grey.

Now, how fun is that?!?!


Thursday, December 19, 2013

I Got a New Lamp

I got a new lamp last month, for three reasons:  I love lamps, I love the color orange, and I love sales.


I bought it in early November when there were still lots of colorful leaves.  The chevron on the lamp shade looks like falling leaves.


That must have been an omen, because shortly after buying it, while taking a walk, I got hit in the head by falling leaves.  That was the first time that happened to me and it felt nice - a couple of feather-soft taps on the top of my head.  That was a good enough inspiration for me to start planning a quilt.  


First I collected a nice assortment of leaves.


Then I started pulling some coordinating fabric.


This is what I wound up with.  Now that it's been six weeks or so, and I've chosen a quilt pattern, I see I have too many fabrics.  The pattern has a healthy dose of "white space" so I really need to edit down unless I want a really scrappy look.  I guess I won't know for sure until I start cutting and throwing them on the design board.  

I'm going to start on this today.


Monday, July 29, 2013

Making It Mine - Retro Lamp

Today I'm starting a new series called "Making It Mine".  The idea is I start with an old item I buy, then I change it somehow to put my own mark on it.   In this episode, we'll see what I do to a lamp I bought last month from a thrift store, sold without a shade.   In My Next Project, I gave you a peek at the lamp, trim, and fabric.  Now we'll see how they all came together.


The lamp was fine; all I needed to do was buy a shade.  Or so I thought.  I hauled that lamp to a bunch of stores, with no luck.  Being an old lamp, it needed a shade with the hardware at the top.  All the pretty shades had dropped hardware.  The only ones I could find with hardware at the top were cream colored.  That would have worked technically, but not emotionally, for me.  

I lucked out at JoAnn Fabrics where I found the perfect lampshade:  hardware on the top, correct size, and designed to be recovered with cool fabric. 


The first step is to remove the paper covering from the lampshade and use it as a template to cut out the fabric.  I realized there would be a curve, so I was careful to buy fabric with an overall, random pattern.  I knew that if I bought something directional (like a stripe or zigzag), that it would only line up on one side - the other sides would be off-kilter.


So far, so good.  I couldn't remember if the paper overlapped itself, so I cut a little extra at the back edges to make sure I had an overlap.  Turns out I didn't need to do that.


The adhesive on the lampshade had me worried.  I didn't want the fabric to flop down and get caught where I didn't want it to go.  So I pinned it back so that I could concentrate on just one section.


This is how I did the first side.  I laid the lamp on the template paper, so it wouldn't stick to my work table.  You can see the top edge of the lamp at the bottom of the photograph.  That's because the lampshade had a pitch to it, where the bottom was a bigger diameter than the top.  By placing it like this, I could easily see the entire side, because the slope was towards me, instead of away from me.

Line up the top and bottom edges of the fabric with the edges of the lampshade.  Being a square lampshade, there were distinct corners to match up which made it easy.  Then just apply a little pressure with your hand to smooth it into place.


To do the other sides, just rotate the lampshade so you have the next "blank" side facing up, unpin the next section of fabric, line it up, and press into place.

I used Aleene's Tacky Glue to secure the overlapped edge.  Then you see that green trim in the upper right corner, laying on my work table?  I used more of Aleene's glue to attach that trim to the top and bottom edges of the shade.  I don't have a picture of that step.  Just be sure that you start and stop where your fabric overlaps, so all your raw edges are on the same side.

And here's something else I learned after I was all done and turned the lamp on:  The shade itself has overlapped edges.  I didn't notice that, so my fabric overlapping is on a different side than the shade's overlapping edges.  Now when I turn on my light, I see a vertical strip on two sides.  Drat.


So here's my retro lamp.  It's really, really tall - nearly 34 inches.  The lamp base has an Art Deco vibe to me.  The lines look like the top of the Chrysler Building, as well as its elevator doors.  The lampshade fabric looks more like the 1960s, but that's OK with me.  I like both eras.