Here's another from my collection of vintage ceramics turned into pin cushions. I gravitate towards animals, but only certain kinds. Up to now it's been only cats and dogs.
But now I'm excited to welcome this cute elephant.
It lives in this little shadow box with elephant button "pictures" on the wall.
Showing posts with label pin cushions. Show all posts
Monday, June 13, 2016
Monday, June 6, 2016
Monday Is Fun Day - Dog and Cart Pincushion
Over the weekend, I bought more pin cushions made from vintage ceramic planters.
Here's a dog pulling a cart. I have it paired with a vintage postcard...
... and some other fun objects.
Here's a dog pulling a cart. I have it paired with a vintage postcard...
... and some other fun objects.
Monday, May 30, 2016
Monday Is Fun Day - Chair Pin Cushion
When I bought my three sewing baskets a few weeks ago, I also bought this chair pin cushion.
This is where I keep it.
Monday, April 11, 2016
Monday is Fun Day - Vintage Cat Pin Cushion
The last time I was at the place that I bought my vintage dog pin cushion from, I found lots and lots more of them.
This time I bought the cat.
It wasn't until I took the photographs this morning that I noticed the scissors charm.
This time I bought the cat.
It wasn't until I took the photographs this morning that I noticed the scissors charm.
Monday, December 14, 2015
Monday is Fun Day - Vintage Dog Pin Cushion
At the flea market this weekend, I gave in and bought a pin cushion I had been looking at for three months.
Now that I have it home, I wonder why I waited so long.
It looks like the pins are sticking in his head, but they're not.
You can see that there's a pin cushion that sits behind the dog.
It started life as a planter, but it's much happier now.
Now that I have it home, I wonder why I waited so long.
It looks like the pins are sticking in his head, but they're not.
You can see that there's a pin cushion that sits behind the dog.
It started life as a planter, but it's much happier now.
Friday, October 23, 2015
Spool Pin Cushion
I didn't think I needed another pin cushion, but who am I kidding? They take so little time to make and are an easy way to try out a new block.
Spools of thread are a common motif in quilt patterns, but I hadn't made one until last month.
I used the free pattern from Fresh Lemons Quilts.
If you like spool blocks, check out Faith's Fresh Spool Series that started this past Monday. Every week for the next five weeks, she'll share another spool pattern.
Spools of thread are a common motif in quilt patterns, but I hadn't made one until last month.
I used the free pattern from Fresh Lemons Quilts.
If you like spool blocks, check out Faith's Fresh Spool Series that started this past Monday. Every week for the next five weeks, she'll share another spool pattern.
Saturday, March 14, 2015
Dressmaker Pin Cushion
I was doing some changing around in my sewing room last week and decided the new decor called for a new pin cushion. Plus I was eager to try out the walnut shells I bought last month.
I thought a dressmaker theme would be fun, so I pulled these fabrics from my stash.
I used a simple paper-pieced spool pattern and fussy cut the images to go where I wanted them. Then I added my button pins, which were unearthed during the room rearranging.
This is the back. I really like these walnut shells! In the past, I stuffed all my pin cushions with fiberfill and they were too light. This one has a nice heft to it, like a bean bag.
It's about 4 inches square.
It almost disappears in a piggy pile of tape measures.
I thought a dressmaker theme would be fun, so I pulled these fabrics from my stash.
I used a simple paper-pieced spool pattern and fussy cut the images to go where I wanted them. Then I added my button pins, which were unearthed during the room rearranging.
This is the back. I really like these walnut shells! In the past, I stuffed all my pin cushions with fiberfill and they were too light. This one has a nice heft to it, like a bean bag.
It's about 4 inches square.
It almost disappears in a piggy pile of tape measures.
Wednesday, May 28, 2014
Move It
Sometimes there's a hard way to do things, and sometimes there's an easy way.
I love this pincushion that I made a few years ago. It's tiny - just 3" square. The top has some pleats folded into it, and I sewed mini buttons on the top. Since the only things I ever stick in it are two needles, the buttons don't present much of an obstacle. I always know where my needles for binding and other hand sewing are. (I have a different one for my embroidery needles.)
However, what I don't love is how it looks on my pale pink vintage kitchen cart. The top shelf of the cart is where I keep all the sewing supplies I need at my fingertips. All the other items on the shelf are vintage and more subdued in color.
It bugged me so much, I finally had to do something about it this week. I decided I needed to make a new pincushion, in fabric that would complement everything else on that shelf. In all my stash, I only found one piece of fabric that would work, and it was only a scrap.
I set it on the pink shelf, next to the discordant pincushion, then left the room. A minute later I buzzed back in, and do you think I could find that fabric? I looked all over the place, frustrated and puzzled. After buzzing in and out a few more times, I found it on the floor - it had slipped right off the shelf. Coincidence? Sabotage by an insecure pincushion that didn't want to be replaced? Hmm.
My solution was to move the pincushion to a different, nearby location. It's still at my fingertips, and now it looks much better. I didn't feel like making another pincushion anyhow.
Friday, February 28, 2014
Fifth Time's the Charm
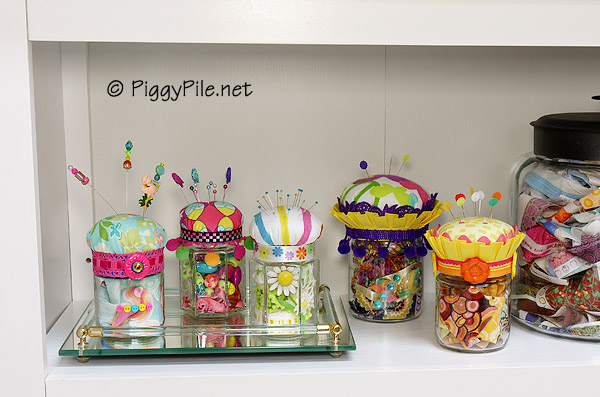
Remember those four pincushion jars I made earlier this month? My intention was to make them for our quilt guild to sell and make some money. But I liked them. A lot. And decided I needed to keep them. So I thought I would give it another go; this time determined not to form a close attachment.
This one I'm giving away. It's a little larger than the others, and holds a little of everything - beaded trim, fabric, and ribbon. Since this will be going to a new home, I made sure to glue the lacy purple trim that's peeking out from the yellow pleats. I had something similar on one I kept, but I just tucked it in. I didn't want someone to buy this, get it home, and have that piece pop out and look dumb.
Here is is, wondering what's going on with those pins on the tray.
And here it is, feeling more at home, at least temporarily.
This one I'm giving away. It's a little larger than the others, and holds a little of everything - beaded trim, fabric, and ribbon. Since this will be going to a new home, I made sure to glue the lacy purple trim that's peeking out from the yellow pleats. I had something similar on one I kept, but I just tucked it in. I didn't want someone to buy this, get it home, and have that piece pop out and look dumb.
Here's the other side, where you can see more of the jar contents. When I fill the jars up, I try to keep them looking good on all sides. The pincushion top on this one is flannel with hearts and peace signs.
And here it is, feeling more at home, at least temporarily.
Tuesday, February 11, 2014
Pin Cushion Jar Tutorial
Last month I bought Super-Cute Pincushions by Kate Haxell. On the cover they had pincushion jars, a brand-new concept for me.
I just had to make my own versions.
Her jars were filled with ribbons and trims. I used that for one jar, but in the others I used beads, fabric scraps, and jewelry. Any kind of small collection, like sea glass, would work well. The larger the jar, the more creative you can be. My jars are about 4" tall (excluding the pincushion) and 3" across.
Her pincushion tops were funnel-shaped, so they were pointy. I made mine circular so they would be flat.
She had a decorative pom pom right smack in the middle of the pincushion, which I thought would get in the way of the pins, so I left that off.
First thing to do is pick out the fabric for your pincushion. It's OK if you use scraps and piece them, like I did here. I bought this 3" strip of fabric as a remnant and had forgotten about it. When I bought it, I planned on using it for a binding, but the pincushion got there first.
To make the pincushion, cut a circle out of cardboard or mat board the same size as your lid. Then cut a circle of fabric at least twice the diameter of the lid. I like to cut circles with this template.
Make a running stitch around the perimeter of the circle. Grab a generous handful of fiberfill and stuff it. Put the cardboard circle on top of the stuffing, since it's going to be the base.
Pull the stitching tight and tie off. Cover the lid with an ample supply of Aleene's Tacky Glue. I like it much better than hot glue. After I put the pincushion on the lid, I put a heavy book on top to squish it down so it would stick good and tight. I left it sitting on there for about an hour.
Now the fun part - make a piggy pile with all your trim, fabric tidbits, and beads. Start loading up the jar bottoms and pick coordinating trims and notions to decorate the jar lid.
This first pincushion is the one we've been looking at so far. It was the simplest. The jar is filled with trims and an enamelled-daisy pin from the 1960s. Just one ribbon around the lid, and regular old stick pins.
This one is filled with fabric scraps. There are three trims on the lid - yellow pleats are overlaid with a striped ribbon. Both of them were affixed with Aleene's Tacky Glue. The pink rick rack is just tucked in afterwards.
There are four buttons (two orange and two yellow, but the same design) glued on the jar rim, and that was kind of tricky. It was easy enough to cut the shanks off with a made-for-that-purpose tool I bought at JoAnn. (They had it in the button aisle.) But it was trickier to get the glue to stick because the buttons were applied to a vertical surface. If I had done one at a time, with the jar laying on its side, that would have worked better. But that would take too long and I wanted to see how cute it was immediately! So I periodically had to press them tightly over the course of their drying period.
Plain daisy pins looked good on this pincushion.
The jar is filled with large beads and sparkly beaded ribbon trim. Two types of trim liven up the lid - big old round pom poms covered by a length of geometric, checkerboard ribbon.
Some of the pins are pearl-topped. I bought them because they're so pretty, but the pins are very thick so I don't use them. I was happy to at least use them as decoration here.
The bird pins are buttons. I cut off the shanks and glued them to a flat-headed daisy pin.
Lots of shiny going on with this pincushion, between the beads, pearl pins, shiny ribbon, and angles of the jar.
This one is filled with fabric scraps. The lid has just one ribbon trim with two buttons. The shiny one nestles just right into the pink one and provides a nice contrast. The tiny row of buttons on the jar cover up a date stamp.
Making these pins was my favorite part of this entirely fun project. The flamingo is a button glued to a daisy pin. Again, cut the shank off before gluing.
The "hatpins" are beading needles that I never used. They are really long, and open up in the center. I don't even know what their original purpose was, but I'm glad I found a use for them. I wrapped a tiny bit of soft metal wire around the needle to act as a brake so the beads wouldn't fall down. Then I added an assortment of beads. For the pink one, I used glue between each of the beads, but for the other two I only used glue on the top two beads.
I like pincushions to look at, but not to use. It takes too long to pull the pins out and stick them in again. I always put my pins in shallow bowls or dishes. Lately I've been using this plastic serving dish from the 1950s. I love these little relish trays. I have another one that I use for my office supplies.
I'm looking forward to trying some other projects from that book. And I'm also looking forward to finding different kinds of pins. I'll have to make a new pincushion jar every time I find new pins.
I just had to make my own versions.
Her jars were filled with ribbons and trims. I used that for one jar, but in the others I used beads, fabric scraps, and jewelry. Any kind of small collection, like sea glass, would work well. The larger the jar, the more creative you can be. My jars are about 4" tall (excluding the pincushion) and 3" across.
Her pincushion tops were funnel-shaped, so they were pointy. I made mine circular so they would be flat.
She had a decorative pom pom right smack in the middle of the pincushion, which I thought would get in the way of the pins, so I left that off.
First thing to do is pick out the fabric for your pincushion. It's OK if you use scraps and piece them, like I did here. I bought this 3" strip of fabric as a remnant and had forgotten about it. When I bought it, I planned on using it for a binding, but the pincushion got there first.
To make the pincushion, cut a circle out of cardboard or mat board the same size as your lid. Then cut a circle of fabric at least twice the diameter of the lid. I like to cut circles with this template.
Make a running stitch around the perimeter of the circle. Grab a generous handful of fiberfill and stuff it. Put the cardboard circle on top of the stuffing, since it's going to be the base.
Pull the stitching tight and tie off. Cover the lid with an ample supply of Aleene's Tacky Glue. I like it much better than hot glue. After I put the pincushion on the lid, I put a heavy book on top to squish it down so it would stick good and tight. I left it sitting on there for about an hour.
Now the fun part - make a piggy pile with all your trim, fabric tidbits, and beads. Start loading up the jar bottoms and pick coordinating trims and notions to decorate the jar lid.
This first pincushion is the one we've been looking at so far. It was the simplest. The jar is filled with trims and an enamelled-daisy pin from the 1960s. Just one ribbon around the lid, and regular old stick pins.
This one is filled with fabric scraps. There are three trims on the lid - yellow pleats are overlaid with a striped ribbon. Both of them were affixed with Aleene's Tacky Glue. The pink rick rack is just tucked in afterwards.
There are four buttons (two orange and two yellow, but the same design) glued on the jar rim, and that was kind of tricky. It was easy enough to cut the shanks off with a made-for-that-purpose tool I bought at JoAnn. (They had it in the button aisle.) But it was trickier to get the glue to stick because the buttons were applied to a vertical surface. If I had done one at a time, with the jar laying on its side, that would have worked better. But that would take too long and I wanted to see how cute it was immediately! So I periodically had to press them tightly over the course of their drying period.
Plain daisy pins looked good on this pincushion.
The jar is filled with large beads and sparkly beaded ribbon trim. Two types of trim liven up the lid - big old round pom poms covered by a length of geometric, checkerboard ribbon.
Some of the pins are pearl-topped. I bought them because they're so pretty, but the pins are very thick so I don't use them. I was happy to at least use them as decoration here.
The bird pins are buttons. I cut off the shanks and glued them to a flat-headed daisy pin.
Lots of shiny going on with this pincushion, between the beads, pearl pins, shiny ribbon, and angles of the jar.
This one is filled with fabric scraps. The lid has just one ribbon trim with two buttons. The shiny one nestles just right into the pink one and provides a nice contrast. The tiny row of buttons on the jar cover up a date stamp.
Making these pins was my favorite part of this entirely fun project. The flamingo is a button glued to a daisy pin. Again, cut the shank off before gluing.
The "hatpins" are beading needles that I never used. They are really long, and open up in the center. I don't even know what their original purpose was, but I'm glad I found a use for them. I wrapped a tiny bit of soft metal wire around the needle to act as a brake so the beads wouldn't fall down. Then I added an assortment of beads. For the pink one, I used glue between each of the beads, but for the other two I only used glue on the top two beads.
I like pincushions to look at, but not to use. It takes too long to pull the pins out and stick them in again. I always put my pins in shallow bowls or dishes. Lately I've been using this plastic serving dish from the 1950s. I love these little relish trays. I have another one that I use for my office supplies.
I'm looking forward to trying some other projects from that book. And I'm also looking forward to finding different kinds of pins. I'll have to make a new pincushion jar every time I find new pins.
Subscribe to:
Posts (Atom)