Today I finished the second set of potholders that will be sold at our quilt guild. I know that all potholders are used with ovens!
But the quotes around "oven" are because of the fussy-cut center panel I used in the log cabin block.
These are really big potholders. The rooster set was 8" x 8" which seemed a little small. I got a little carried away with the log cabin blocks and this set is 8" x 10".
Here's a better look at the oven component.
Like the rooster set, they have pockets to make them ergonomically correct.
Our house has a cookie dog, not a cookie monster.
Saturday, March 15, 2014
Tuesday, March 11, 2014
Rooster Potholders
I made some potholder plans a few weeks ago, and finally completed the first set.
These are the rooster potholders.
The backing had a diamond-grid, so in order to secure it to the green striped fabric, I made a row of horizontal stitching through the long end of the diamonds.
As you can see, there's a pocket on the front to put your hand in. I think potholders work better this way, making them more like a mitt.
As far as construction goes, I made the back section first (the green striped fabric). Then I made the pocket, which was two pieces of fabric on either side of regular batting. Lastly, I lined up the bottom and sides of both pieces and used a normal binding technique like I would do on a quilt.
The only thing I would do differently would be to use a wider piece of binding. I used 2", but that silver stuff is VERY thick and I really had to tug on the binding to get it to cover the raw edge.
Since the potholders are going to our quilt guild to raise money, I made myself this set to keep at home. I use them during mealtime to put under hot/cold dishes and mugs.
I used Insul-Bright batting. I don't know how to use it very well, though. They say to make sure the side with the most metal is the side that goes toward your hot or cold object. But I have trouble telling which side has the most metal - one side seems to have approximately .007% more metal than the other, in my opinion.
Say cheese! Just don't say "chicken dinner."
These are the rooster potholders.
The backing had a diamond-grid, so in order to secure it to the green striped fabric, I made a row of horizontal stitching through the long end of the diamonds.
As you can see, there's a pocket on the front to put your hand in. I think potholders work better this way, making them more like a mitt.
As far as construction goes, I made the back section first (the green striped fabric). Then I made the pocket, which was two pieces of fabric on either side of regular batting. Lastly, I lined up the bottom and sides of both pieces and used a normal binding technique like I would do on a quilt.
The only thing I would do differently would be to use a wider piece of binding. I used 2", but that silver stuff is VERY thick and I really had to tug on the binding to get it to cover the raw edge.
Since the potholders are going to our quilt guild to raise money, I made myself this set to keep at home. I use them during mealtime to put under hot/cold dishes and mugs.
I used Insul-Bright batting. I don't know how to use it very well, though. They say to make sure the side with the most metal is the side that goes toward your hot or cold object. But I have trouble telling which side has the most metal - one side seems to have approximately .007% more metal than the other, in my opinion.
Say cheese! Just don't say "chicken dinner."
Thursday, March 6, 2014
Leah Duncan Ladder
Last week I went to The Sewcial Lounge to buy some Leah Duncan fabric. I left with a couple of ideas I wanted to incorporate in my sewing room. First, the fabric.
These are all by Leah Duncan for Art Gallery Fabrics. Some are from her first collection, Tule; some are from her second collection, Meadow.
In my opinion, Art Gallery is one of the best fabric companies around. Not only do they have extremely high-quality fabric with a beautiful hand, they have a lively blog, and do a fabulous job supporting and promoting their fabric designers.
In Leah's case, there's a Tule video and a Meadow lookbook.
The Sewcial Lounge uses vintage ladders to display fabric. I liked that idea a lot, and spent several days trying to come up with something similar without spending any money. I tried ladders from the garage - nope! I tried making do with other ladderlike objects laying around and finally gave in to a trip to a home improvement store.
After considering many options, some of them totally out-of-the-box, I settled on a package of six 6-foot wooden garden stakes. My husband built two "ladders" for me for less than $7. The best part is, he custom made them to the exact height and width I needed.
The ladders are nice and light, yet strong enough to hold these half-yard cuts.
I didn't plan on buying so much Leah Duncan when I entered the store. I was only going to buy material for this tunic. You know how that goes.
The other thing that was a wow factor for me at The Sewcial Lounge was her display of new fabric. As soon as you walk into the store, you see a large table tastefully and invitingly arranged with new items.
That got my adrenaline going and my brain to thinking. Wouldn't it be nice to see something like that every time I walk into my sewing room?, I asked myself. I didn't have room for a separate table, but I do have room for the two ladders. They're leaning against either side of the entryway, hung with the new fabric. So inviting!!!
These are all by Leah Duncan for Art Gallery Fabrics. Some are from her first collection, Tule; some are from her second collection, Meadow.
In my opinion, Art Gallery is one of the best fabric companies around. Not only do they have extremely high-quality fabric with a beautiful hand, they have a lively blog, and do a fabulous job supporting and promoting their fabric designers.
In Leah's case, there's a Tule video and a Meadow lookbook.
The Sewcial Lounge uses vintage ladders to display fabric. I liked that idea a lot, and spent several days trying to come up with something similar without spending any money. I tried ladders from the garage - nope! I tried making do with other ladderlike objects laying around and finally gave in to a trip to a home improvement store.
After considering many options, some of them totally out-of-the-box, I settled on a package of six 6-foot wooden garden stakes. My husband built two "ladders" for me for less than $7. The best part is, he custom made them to the exact height and width I needed.
The ladders are nice and light, yet strong enough to hold these half-yard cuts.
I didn't plan on buying so much Leah Duncan when I entered the store. I was only going to buy material for this tunic. You know how that goes.
The other thing that was a wow factor for me at The Sewcial Lounge was her display of new fabric. As soon as you walk into the store, you see a large table tastefully and invitingly arranged with new items.
That got my adrenaline going and my brain to thinking. Wouldn't it be nice to see something like that every time I walk into my sewing room?, I asked myself. I didn't have room for a separate table, but I do have room for the two ladders. They're leaning against either side of the entryway, hung with the new fabric. So inviting!!!
Monday, March 3, 2014
I Went to Buy an Orchid
I keep trying to buy orchids, but never seem do to it. Last week I tried again. No luck.
This is what I came home with. The last time we had one of these plants (Schleffera), it grew to 5 feet tall and 6 feet wide. It showed no signs of stopping and it was crowding the room, so we got rid of it. The tag on this one said "mini", so we'll see.
You might wonder why I chose this plant. Well, I'll tell you.
The first thing that caught my eye when I walked into the nursery was this tiny "trellis". I grabbed it, since it was cute and had color that I was craving.
The second thing that caught my eye was this tiny chair. I knew there was a pig at home that would fit just right, and he does.
In fact, there were two.
Pigs like shade, since they don't have sweat glands. And that's the reason I bought the Schleffera.
I still hope to buy an orchid one of these days.
This is what I came home with. The last time we had one of these plants (Schleffera), it grew to 5 feet tall and 6 feet wide. It showed no signs of stopping and it was crowding the room, so we got rid of it. The tag on this one said "mini", so we'll see.
You might wonder why I chose this plant. Well, I'll tell you.
The first thing that caught my eye when I walked into the nursery was this tiny "trellis". I grabbed it, since it was cute and had color that I was craving.
The second thing that caught my eye was this tiny chair. I knew there was a pig at home that would fit just right, and he does.
In fact, there were two.
Pigs like shade, since they don't have sweat glands. And that's the reason I bought the Schleffera.
I still hope to buy an orchid one of these days.
Friday, February 28, 2014
Fifth Time's the Charm
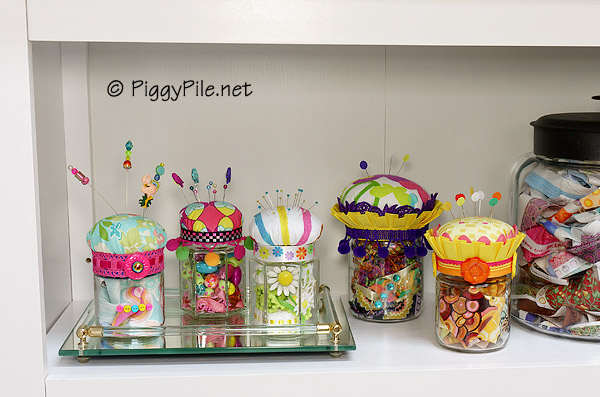
Remember those four pincushion jars I made earlier this month? My intention was to make them for our quilt guild to sell and make some money. But I liked them. A lot. And decided I needed to keep them. So I thought I would give it another go; this time determined not to form a close attachment.
This one I'm giving away. It's a little larger than the others, and holds a little of everything - beaded trim, fabric, and ribbon. Since this will be going to a new home, I made sure to glue the lacy purple trim that's peeking out from the yellow pleats. I had something similar on one I kept, but I just tucked it in. I didn't want someone to buy this, get it home, and have that piece pop out and look dumb.
Here is is, wondering what's going on with those pins on the tray.
And here it is, feeling more at home, at least temporarily.
This one I'm giving away. It's a little larger than the others, and holds a little of everything - beaded trim, fabric, and ribbon. Since this will be going to a new home, I made sure to glue the lacy purple trim that's peeking out from the yellow pleats. I had something similar on one I kept, but I just tucked it in. I didn't want someone to buy this, get it home, and have that piece pop out and look dumb.
Here's the other side, where you can see more of the jar contents. When I fill the jars up, I try to keep them looking good on all sides. The pincushion top on this one is flannel with hearts and peace signs.
And here it is, feeling more at home, at least temporarily.
Tuesday, February 25, 2014
My Olympic Event
On the slopestyle course of the Winter Olympics in Sochi, you could see a giant, modern matryoshka doll in the background as snowboarders and skiers flew past. AP photographer Sergei Grits captured it in a photograph that became one of Yahoo's "photos of the day" on February 4, 2014.
Inspired, I remembered that my favorite embroidery book, Doodle Stitching, had matryoshka motifs, so embroidery became my Olympic event.
Matryoshka figures have no set number of dolls. The three smaller ones are from Doodle Stitching...
... but I drew the fourth and largest one based on Grits' photograph. Note the goggles.
Although I found two sets of matryoshka dolls at two different antique venues this month, I didn't buy them because of their color and personality. But when I saw this set, I knew they were coming home with me, even though they didn't nest. They looked happy, not dour.
The first Russian doll set was carved in 1890 by Vasily Zvyozdochkin from a design by Sergey Malyutin, who did the painting. They were inspired by a carved doll from Japan, so this Oriental set that I bought in 2012 isn't that far fetched an idea.
Making new friends at the Olympics. Forget about bean counting which country got the most medals.
I didn't finish my mini-quilt before Sunday's closing ceremony. I was a day late; I guess I'm no Olympian.
Inspired, I remembered that my favorite embroidery book, Doodle Stitching, had matryoshka motifs, so embroidery became my Olympic event.
Matryoshka figures have no set number of dolls. The three smaller ones are from Doodle Stitching...
... but I drew the fourth and largest one based on Grits' photograph. Note the goggles.
Although I found two sets of matryoshka dolls at two different antique venues this month, I didn't buy them because of their color and personality. But when I saw this set, I knew they were coming home with me, even though they didn't nest. They looked happy, not dour.
The first Russian doll set was carved in 1890 by Vasily Zvyozdochkin from a design by Sergey Malyutin, who did the painting. They were inspired by a carved doll from Japan, so this Oriental set that I bought in 2012 isn't that far fetched an idea.
Making new friends at the Olympics. Forget about bean counting which country got the most medals.
I didn't finish my mini-quilt before Sunday's closing ceremony. I was a day late; I guess I'm no Olympian.
Subscribe to:
Posts (Atom)