Monday, June 9, 2014

Monday is Fun Day - Siesta Ware

Monday is the day we look at fun items I've collected from vintage or new sources.  


Did you ever hear of Siesta Ware?  I hadn't, until yesterday when I found these at a flea market.

Siesta Ware was produced by the Benner Glass Company of Jacksonville, Florida.  The company was formed in December 1959, but is now inactive.  They applied for a trademark under the name "Siesta Ware", a play on the popular Fiesta Ware, in 1963, and the trademark expired 22 years later.
 

They made a variety of glassware - primarily glasses and mugs, but also jars, bowls, salt and pepper shakers, vases, planters, pitchers, and bottles.  But the primary classification on the trademark application was "alcoholic beverages (except beers)".

Most of their glassware is frosted and often incorporates brass rings and wood "grab" parts - either a handle on a mug or the area on a glass tumbler where your hand grabs it.


My mugs are part of the Tiki Bar Hawaiian Beachcomber set.  This tangerine one is my favorite color.  No, wait, maybe the aqua one.  Or the pink one.  Or the blue or yellow one...


Monday, June 2, 2014

Monday is Fun Day - Lily of the Valley Pitcher

Monday is the day we look at fun items I've collected from vintage or new sources.  


My lily of the valley pitcher is just over four inches tall.  I bought it at an antique store sometime in the last five years.  I like it because it looks like Majolica, but it's not, which means it was in my price range. 

The inside is a pretty, pale pink.

I've waited years to have enough lily of the valley to fill this pitcher, and this was the year it finally happened.

Now, how fun is that?


Saturday, May 31, 2014

I Felt Like It

I went to JoAnn Fabrics this week to buy some sealer.  I'm making a clock to sell as a fund-raising item for our guild, and the Mod Podge label says to use a sealer.  I didn't put sealer on the first clock I made for myself last year, but this time I thought I should follow directions.  But when I asked a JoAnn employee, she said the sealer they recommend is a spray.  I don't like sprays, and decided the clock would be fine without it.

But since I was at JoAnn and didn't want to leave empty-handed, I turned my attention to their felt.


I keep finding items in my new books and magazines that are made out of felt.  They use the "good" felt - 35% wool.  But since these projects are just going to be for me, and who knows how long it will before I get tired of them, I went with the cheap felt.

They have such nice patterns now that I hadn't seen before.  The patterned pieces are a little over $1 each and the plain ones are about 33 cents.  They didn't have any white rectangles, so I went to the bolts of felt and bought 1/3 yard.  It was on sale and only cost $1.


Some of these are going to be inner ears of elephants.


This set looks buoyant.  I really like that salmon/white design whose name I should know.  It was hard for me to buy that bland beige in the lower left, but sometimes you need a little bland.


Flower power - more of that 60s vibe brought into to the 21st century.


The tie-dye is a little much for me when it's all in one piece, but cut apart into sections it will be interesting.


This is going to be a house.


And this will be the house next door.

I know that was a lot of pieces to buy (and for most of these I bought doubles), but I did it anyway because I felt like it.


Friday, May 30, 2014

In a Different Light

Last week I moved my Spring Stained Glass Quilt to a different spot.


The new location is much darker, so I put a lamp under it to light it.  It has a cozy feel now, that's different, but not necessarily better than how it looks in full daylight.


One thing I like about this different light is that it casts shadows which accentuates the hand quilting.


And who can resist the opportunity to display another lamp?  This one is from a garage sale a few years ago - I don't remember what color it used to be, but I do remember painting it yellow.


Wednesday, May 28, 2014

Move It

Sometimes there's a hard way to do things, and sometimes there's an easy way.


I love this pincushion that I made a few years ago.  It's tiny - just 3" square.  The top has some pleats folded into it, and I sewed mini buttons on the top.  Since the only things I ever stick in it are two needles, the buttons don't present much of an obstacle.  I always know where my needles for binding and other hand sewing are.  (I have a different one for my embroidery needles.)


However, what I don't love is how it looks on my pale pink vintage kitchen cart.  The top shelf of the cart is where I keep all the sewing supplies I need at my fingertips.  All the other items on the shelf are vintage and more subdued in color.

It bugged me so much, I finally had to do something about it this week.  I decided I needed to make a new pincushion, in fabric that would complement everything else on that shelf.  In all my stash, I only found one piece of fabric that would work, and it was only a scrap.

I set it on the pink shelf, next to the discordant pincushion, then left the room.  A minute later I buzzed back in, and do you think I could find that fabric?  I looked all over the place, frustrated and puzzled.  After buzzing in and out a few more times, I found it on the floor - it had slipped right off the shelf.  Coincidence?  Sabotage by an insecure pincushion that didn't want to be replaced?  Hmm.


My solution was to move the pincushion to a different, nearby location.  It's still at my fingertips, and now it looks much better.  I didn't feel like making another pincushion anyhow.


Monday, May 26, 2014

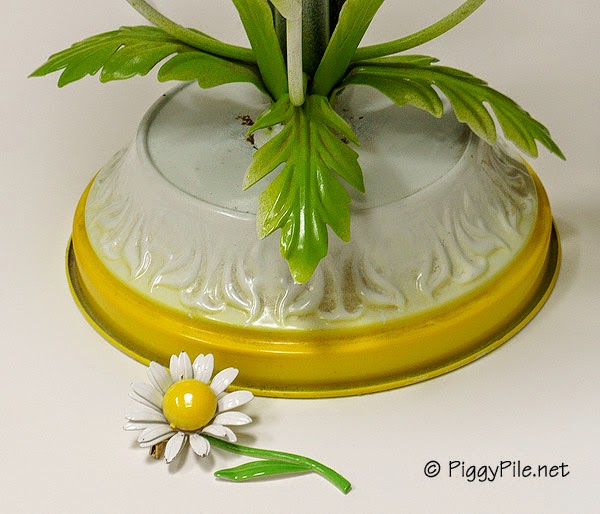
Monday is Fun Day - Italian Tole Daisy Lamp

I'm starting a new feature today, called "Monday is Fun Day".  Every day should be a fun day, really, but Monday rhymes so we'll go with that.  What we'll do is look at fun items I've collected from flea markets, antique stores, art shows, thrift stores, and garage sales.

I went to my first flea market of the year earlier this month.  One vendor caught my eye because of all the hanging chandeliers.  It was a perfect day, temps in the 60s, and the sun made all the chandeliers sparkle.

I don't have any use for a chandelier, but I definitely needed one of his Italian tole lamps.  This one is from the late 1960s to early 1970s.  I love lamps.  I counted how many I had once, and it was such a big number that I put a mental block on it and can no longer remember how many it was.  Then I told myself not to count them again.


I love my new lamp because it reminds me of this daisy pin from the same era, which I bought last year. 


The lamp didn't have a lampshade, just a harp.  I carried the lamp to numerous stores looking for a shade that had the "cross hairs" level with the top of the shade.  Most of the shades nowadays have that part dropped about halfway down the shade.

I wasn't having any luck, but I did find out I was harp-challenged when I explained my predicament to a store employee.  She grabbed the harp, squeezed, (while I held my breath and hoped she wouldn't break my lamp), and said "They usually come out like this."  And miraculously, she removed the harp.  I had tried pulling and pulling on it previously, to no avail.  Squeezing did the trick. 

And now, being harpless, I  found myself with a plethora of lamp choices.  I picked this one from Target, because it looked like metal (even if it wasn't), and matched the metal base.

Good thing I won't be using the harp in the future, since I managed to lose the finial.  I think some things get done accidentally on purpose.


The vendor had rewired the lamp, so it's safe to use.  With the light on, the shade turns a nice pale grey.

Now, how fun is that?!?!


Friday, May 23, 2014

Tomato Cage Chandeliers

I made "chandeliers" out of tomato cages five years ago.  They could be real chandeliers if I put a light in them, but they'd probably catch on fire.  Instead, they were temporarily lit up to be photographed.


This is the largest.  The tomato cage is inverted, and the legs are folded at a 90-degree angle toward the center, so you have something to hang it from.

I cut strips of crepe paper, folded one edge over the rim of the cage, and stapled the two layers of paper together.  There's enough clearance on a stapler to do this.


If you put a turnbuckle on top, you can spin it around.  The colors spiral around in color order (orange to yellow to green to blue to purple).


I also made one with three tiers.


The "black" strip isn't really black; it's an illusion from the lighting.  


This is what it looks like with the lights on.  I took a 2" strip of fabric, turned under 1/4" on both edges, and machine stitched them.  Then I glued it over the top edge of the crepe paper.  This looked better than just having lots of little staples showing.  Plus, it added a little interest.  Otherwise, all that crepe paper hanging looked like, well, a bunch of crepe paper hanging.


This was the first one I made.  The strips are fabric and each one is hand sewn to the rim.  I also hand painted the cage a shiny black.  (This was before stores were selling beautifully colored tomato cages.)  Both of those steps were very time-consuming.  And because I knew I wanted multiple chandeliers, I had to come up with a Plan B - hence the crepe paper chandeliers.


This one has the colors inverted, with green at the top and orange at the bottom.

So there you go - now you have something you can try with your old tomato cages if you no longer want to garden with them.